Enjoy the Process

I often lament that I am a very slllooowwwww scrapbooker.  Once in a while I can crank out a page fairly quickly.  More regularly; however, it takes me what seems just short of forever to complete a page. 

Reasons for my pokiness:

  1. I am picky.
  2. I am a perfectionist.
  3. I am picky.
  4. I am a perfectionist.

Hmmmm….. sensing a theme here.

For me, choosing just the right combination of papers, embellishments and photos is essential.  I audition lots of paper with my photos.  I have a NEED to choose the perfect embellishments to help tell my story.  If I can’t find the right embellies, I create them.  Creating my embellishmemts is what takes so long. 

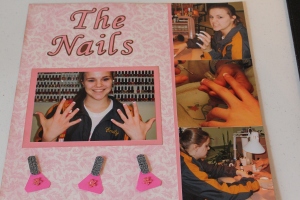
See these little nail polish bottles?  I made them – thought up the idea, figured out how to execute my vision, and carried it out.  Why on earth would I do that?  Because I felt the polish bottles were central to the theme of the page.  They helped tell my story.

I used to “complain”  how slow I was to my friend Petunia.  Petunia, if you’ll remember, is the friend who introduced me to scrapping.  Petunia’s reply was always the same, “Enjoy the process.”  I would roll my eyes and think, “enjoy THIS.”  Pretty soon, every time I would start getting cranky about the time I was spending on a page, I would hear Petunia in my head saying “Enjoy the process.” 

I have now arrived at a place where I truly do enjoy the process.  Each page is it’s own work of art created especially by me.  It has been created with much thoughtfulness and intention.  It tells the story I want it to tell.  It makes me happy.  It makes me smile.  I try to imagine what would have happened if Michaelangelo did not enjoy his process and just slapped some paint on the ceiling of the church.  We would not have the beautiful Sistine Chapel.  Please don’t think I am comparing my work in any way, shape or form to Michaelangelo.  What I AM saying, is that he had a vision.  I have a vision.  He worked with purpose and intention.  I work with purpose and intention.  His work was pleasing to his eye.  My work is pleasing to my eye.  Well, you get the picture.

I have employed the “enjoy the process” mantra to many other areas of my life.  When I get grumpy about cleaning, yard work, laundry, etc., I try to take a breath, calm down and enjoy the process.  I think about how nice it will be when the chore is done.  When I am finished, I take a moment to stand back and admire my work.  I look at the mowed yard and think how neat and tidy and “Better Homes and Gardeny” it looks.  I admire my sparkling bathroom and think about how it looks like a hotel bathroom.  I look at the beautiful meal I have put on the table and think about my family enjoying it. 

When you take a moment to enjoy the process and work with intention and purpose, your mundane tasks seem to pass by a little quicker.  Believe it or not, the song from Disney’s Snow White goes through my head a lot also “Whistle while you work.”  Oh sure, the process can still get me down.  I wouldn’t be human if I thought scrubbing toilets was paradise.  All I am saying is that whether you are scrapping and it’s taking forever to get your page done, or you are sweeping the floor for the hundredth time that day, take a moment to enjoy the process. 

It can change your outlook.

Until next time,

Mama Donna

House vs Home

If you asked me to describe my house, here’s what I would say:

  • Two-story with a full basement
  • 4,500 square feet
  • 4 bedrooms
  • 1 full bath, 2 half-baths, 1 powder room
  • Attached 2.5 stall garage
  • 1.25 acre lot

Just the facts, ma’am, just the facts.

If you asked me to describe my home, I would say:

  • Roomy
  • Comfortable
  • Restful
  • Relaxing
  • Quiet
  • Clean
  • Happy
  • Cozy

Notice that all the words I used to describe my home are “feeling” words, not necessarily descriptive in terms of physical characteristics.  I think of my house like an empty cooking pot.  The pot is merely what holds the food of love.  It is just a shell.  It’s what’s inside that is special.

Since the day I got married (over 26 years ago), I have made a concerted effort to make our house a home.  I want to make our house a place my family wants to come to.  A place of safety, comfort, joy and relaxation.  When my husband and children come through the door, I want them to be able to take a deep breath, and to feel as though they have been wrapped in a warm blanket.  On the wall next to the back door, I have these words:

In my younger days, I was an absolute clean/neat freak.  Now I’m just a freak!  For the most part I was a stay-at-home mom and felt I needed to keep the house spotless in order to justify my existence.  For goodness sake, if I was home all day the house had better be neat as a pin!  After all, what else did I have to do?  I was afraid of being judged as lazy, unmotivated and a bad mom/wife.  These days, I have relaxed my standards.  Don’t get me wrong, the house is still mostly clean and tidy, but I am not knocking myself out daily to keep it pristine.  Know why?  (Believe it or not, it’s not because I’m old and tired!)  The reason is that a pristine home does not exude comfort and restfulness.  To me, it says “sit on the edge of the sofa and don’t touch anything.”  Think about it.  When you enter a formal-looking, not-a-thing-out-of-place-type space, your first thought is probably not to flop down on the Edwardian sofa and plop your feet on the Queen Anne coffee table.  If you are anything like me, you are a bit uneasy the whole time you are interacting in that space because you’re terrified of messing something up.

The goal now, is to help my family and my guests to feel welcome, relaxed and comfortable.  C’mon in, plop on the sofa, cover up with a fuzzy blanket, put your feet on the coffee table.  I will ask you to remove your shoes at the door, but not because we have delicate floors, I just don’t feel like sweeping or vacuuming up the shoe goobies.  Besides that, you’re more relaxed in your stocking feet or bare feet.  When I give you a beverage, I’ll also give you a coaster.  Not because I have terribly expensive furniture, but the furniture I have I’d like to keep looking presentable.  Other than that, I’m good.  Wanna eat on the sofa?  Go ahead.  Drop crumbs on the floor?  No big deal (the dog will Hoover them up).  Wanna stretch out on the sofa for a nap?  Be my guest.  Hungry?  Raid the fridge.

Think about what says “restful” to you.  Does your house reflect that?  Do you look forward to going into your house at the end of a busy day or does the thought of it stress you out?  The single most stressful thing in my house, for me, is visual clutter.  I don’t have a lot of knick knacks, pictures or miscellaneous decorative “stuff.” 

Yes, I have clutter.  Right this second there are magazines on the sofa, newspapers on the floor, a couple dvd’s on the end table and, of course the endless pile of mail on the counter. 

BUT, this bit of clutter will only take a couple minutes of my time to get rid of and put away.  What I don’t like is looking at (and having to dust) a hundred little figurines or pictures.  To me, visual clutter equals chaos.  It is not relaxing, it is not restful and it is just something else I need to maintain.  Why would I want to spend hours dusting stuff or having to move stuff out of the way so I can set something on the table?  Personally, I can’t deal with it.  I used to have tons of little bric-a-brac, but over the years I have applied this litmus test:  Is it something I truly LOVE or just something I thought was cute?  Does it hold special meaning to me or is it taking up space?  Does maintaining it bring more stress than joy?  Just because it was a gift from someone I love, maybe it is not my taste.  Throwing it away, donating it or upcycling it does not mean I don’t love the person who gave it to me or appreciate the thought, it just means it’s not for me. 

 I challenge you to look at your house and its contents.  Decide what items enhance your feeling of “home,” keep those and get rid of the rest.  It is sooooo freeing.

Until next time, my feet on the coffee table,

Mama Donna

Food of Love

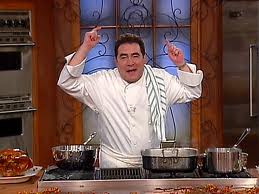
I love Emeril Lagasse.

BAM!

When he had his show(s) on The Food Network, I caught them whenever I could.  He made cooking seem do-able.  Sometimes he used some kind of funky ingredients (translation:  stuff I can’t find in Fargo, North Dakota), but most often he made honest, homey, stick-to-your ribs types of dishes.  His wealth of cooking knowledge, techniques, his humor and his unabashed passion for cooking really spoke to me. 

When Emeril was making a recipe that took some time, was a little more complicated or involved, he would admonish the audience, “It’s a food of love thing…..”  In other words, “Be patient, it’s worth it.”  Over and over, he talked about “food of love” and it set my brain to thinkin’.

I have often said, “You know I like you if I cook for you.”  I don’t cook for people I don’t like.  Harsh?  Maybe, but for me, cooking has always been a food of love thing.  I just hadn’t realized it until Emeril talked about it.  The way I show people I love them is to feed them; to nourish their bodies and their souls.  A little piece of my heart goes into each and every meal I make.  Call me crazy (and a lot of people do), but when I am cooking I am thinking about the people who will consume my food.  I think, “I hope they like this.”  “I hope this turns out good.”  I infuse my love for them into every ingredient and preparation step.

Over the years I have learned that there are different flavors of love.  WHAT?  Ok, now you know for sure I’m nuts.  Here’s the thing.  My mom, sister and I all have the EXACT same pancake recipe.  The crazy part?  Mine don’t taste as good as mom’s, and my sister doesn’t think hers taste as good either.  This has caused many sleepless nights (ok, maybe not, but definitely a lot of frustration) and accusations of mom hiding some secret, magical ingredient.  After discussing it at length with mom and sissy, all we can figure out is that mom’s flavor of love tastes different than ours.  Yup, you read that right – the love tastes different.  Interesting concept, no?

I’d like to urge you to give the food of love concept a try if you don’t already.  Instead of viewing cooking as a chore, try viewing it as a chance to show the people who mean the most to you that you love them.  Doesn’t have to be fancy.  Doesn’t have to be complicated.  Just has to come from your heart.

Until next time, cooking with love,

Mama Donna

Meet Byron

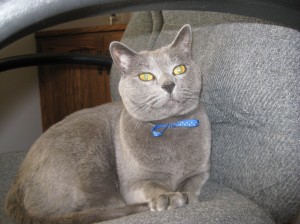
This is Byron.

Byron is our approximately 8-year-old, 16-pound British Shorthair.

He thinks he is a Russian spy.

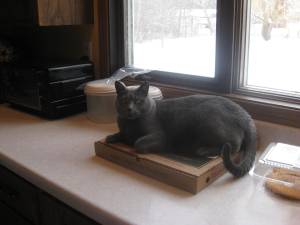
Here he is disguised as a kitchen sink.

Here as a cardboard box.

Notice how well he has mastered the art of blending into his surroundings.

“If you stand in front of the hatch, become the hatch.” (name that movie)

What he is:

  • A cat.
  • A BIG cat.
  • Introspective.
  • Sleepy.
  • Has a thing for strange men (I won’t go into detail here).
  • Soft.
  • Hungry.
  • A total clutz.

What he is not:

  • Dainty.
  • Graceful.
  • Poetry in motion.
  • A snuggler.
  • Unobtrusive.
  • Talkative (except at 6:00 a.m. when he’s yelling in my ear for breakfast and interrupting my beauty sleep).

I am totally, helplessly, 100% in love with this boy.  When I give him lovins, he tilts his head backward so we can rub noses and looks at me with that “I adore you (but you better not tell any of the guys)” face.  He purrs so loud he squeaks.  I wonder if they make cat food in a higher octane to help with that hitch in his motor?

I’m so glad we met.  Sorry to post just a photo of a plain, unadorned pizza box.  I could have sworn Byron was in this photo as well…..

Until next time.

Mama Donna

A Week of Change

This week has been one of change for me, physical and emotional. 

Computer Guy, Buster (my oldest) and I moved Dolly (my youngest) back into the dorm for her Sophomore year. 

Here’s Dolly with all her worldly possessions.

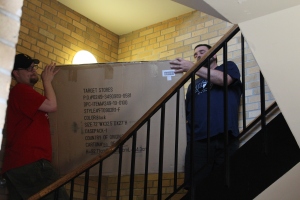
Buster and Computer Guy at the beginning of a six-flights-of-stairs journey with a new futon.  Lift with your knees guys!

Taking a breather after all the hauling.  That’s Nearly-Son-In-Law sitting on the fridge.  He managed to arrive approximately 30 seconds after the last load had been carried up all six flights of stairs.  Have these colleges never heard of a miraculous invention called an elevator???

Tuesday morning Computer Guy left for out-of-town meetings until Thursday evening.  Thankfully we had no wild weather and basement flooding to contend with this time he was gone.

Buster worked a boatload of hours this week.  Since he begins his shift at 4:00 a.m., by the time he gets home he is ready for a nap.

Needless to say, I had a lot of alone time this week.  Ok, I still had my fur boys for company, but not a lot of human interaction.  Don’t get me wrong.  I love my alone time.  I love the peace, the quiet, the solitude.  I would rather be home than anywhere else on the planet.  I had a lot of time to be introspective, contemplative, napulative.  Is that a word?  It is now – Napulative  (nap-yoo-lah-tiv):   v. 1. The state of being very sleepy and prone to nap at the drop of a hat.

I thought a lot about my blog.  After tons of contemplation and napulation (I think better when I sleep) – I decided that this, my tiny little corner of the internet universe, will be not only about scrapping as suggested in the title, but will also be about whatever else happens to pop into my feeble little brain.  Yes, we will scrap.  But we will also get to know each other, maybe cook, maybe sing, maybe craft, who knows?  The point is, I am more than one-dimensional, more than just a scrapper.  I think if you get to know how my brain works (yes a very scary thought – please run and hide if you are so inclined), you will understand how my scrapping style evolved into what it is today and how it will continue to evolve.

Thanks for hanging out with me. 

Until next time,

Mama Donna

Inspiration is Everywhere

Where does one find new ideas and inspiration to create scrapbook pages?  The answer is:  EVERYWHERE! 

As you begin this amazing creative journey, the process of “figuring it out” and inspiration for layouts can be a bit elusive.  I am here to help you ignite that creative spark and provide you with some resources.

A very good friend, I’ll call her Petunia, introduced me to this wonderful world.  She had been scrapping for years, all self-taught.  I picked her brain.  Petunia had some great ideas for organization, supplies and tools.  I marveled at her finished scrapbooks.  I knew that yes, this was the passion for me.

When I was at home, alone; however, I found a certain lack of inspiration and layout ideas.  I didn’t want all my pages to look the same.  I wanted to learn the basics, but also wanted to be “up” on the latest tools, trends and products.  On one of my seemingly daily treks to the local supermarket, I came across two different scrapbook publications while standing in the checkout line.  I decided to pick up a copy of each one, and boy am I glad I did.  One of the magazines is called Creating Keepsakes.  The other is called Scrapbooks, Etc. 

I brought the magazines home, sat down with a cup of coffee (coffee and scrapbooking – two of my favoritest things ever!) and paged through them.  They were filled with great photos, how-to articles, page “recipes” and new product information.  I am a hugely visual person.  I create visions of my projects in my head and attempt to execute them with paper, fabric, yarn, etc.  What I loved about these publications is they often provided page sketches, black and white line drawings of page layouts, but then they show you how they can look when finished with different papers and embellishments.  I immediately checked out their websites and subscribed to both magazines.  You can check them out at:

http://www.creatingkeepsakes.com

http://www.scrapbooksetc.com

Both sites have tons of information, organizational tips, photographs, page layouts and blogs.  I am not affiliated with either of these companies, I just like them.

Around the time I began scrapbooking, Petunia decided to become a Close to My Heart consultant.  She introduced me to some wonderful idea books they carry.  In these books there are recipes for pages.  You can decide you want three photos on a page, and the book will direct you to different layouts containing three photos and show you how to put the page together.  Only one photo for this layout?  No problem.  The books direct you to all the layout ideas containing one photo.  The books also contain lots of neat ideas for techniques and embellishment options. 

http://www.ctmh.com

Again, no affiliation, just great products.

When the creative juices began to flow, I began to find inspiration everywhere.  I had familiarized myself with the myriad of products out there and had learned what they were for.  I had spent time browsing in my local stores and online.  I began to be able to look at a sheet of paper and think, “Hey I have the perfect photo for that!  Wouldn’t it be cute if I….”  Once in a while I would find a piece of paper for which I had no appropriate photos but would think, “I’m going to take a photo of _____ and create a page to go with this paper.”  I would find an old board game in the thrift store and think, “These Scrabble tiles would make a great title on a page.”  I started to think outside the box.  I have always been a saver of ticket stubs, programs, park maps, etc.  Now I had a medium in which to display them.  If your kids dressed like Harry Potter characters last halloween, include the movie stubs from the HP movie you saw with them that fall.  That trip to Sea World you took?  Use the park map as a background for a layout or cut some of the graphics out and use them as accents on your page.  

Inspiration is everywhere.  You just need to open your mind and see things in a new way.  Remember that something doesn’t have to be labeled “scrapbook” to include it in one.  You are telling YOUR story, preserving YOUR memories.  There is no right or wrong. 

Until next time,

Mama Donna

Building Your Paper Stash

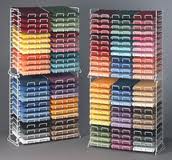
Scrapbookers and paper crafters lovingly refer to their unused paper supply as their “stash.”  It can be big:

It can be small:

The point is, at some time you will have accumulated a “stash.”

How does a person decide how much paper to purchase?  Of course, the answer is, “It depends.”  I’m going to share how I built my stash and hopefully give you some useful insight on how to build yours.

As I mentioned in yesterday’s post, I typically shop with a project in mind.  Truth be told, I usually have SEVERAL projects in mind.  I’ll try and explain.

My daughter was a cheerleader for four years.  Cheer paper and embellishments are not an easy thing to find in my area.  Whenever I would run across cheer-themed paper or embellishments (no matter if I was shopping for another project), I would pick them up in order to build my stash of that type of paper.  This way, when I am ready to scrap those photos, I have my supplies ready to go.  How many of each sheet did I buy?  I do a lot of two-page layouts because I am a photo junkie.  So, when I made my purchase, I usually bought two sheets of the same paper.  My thinking is that I can do a two-page layout with the same background paper, I can do a two-page layout with one printed paper and one piece of cardstock as the background and then use the second piece of printed paper in small blocks on the cardstock page, I have FOUR years of cheer albums to finish and using the same paper in two different albums is no big deal to me.  As far as embellishments go, I almost always buy just one package.  For some weird reason, I don’t like to repeat embellishments, even when they’re in different albums.  Repeating offends my senses, bugs the heck out of me, drives me crazy.   

I have a pretty good memory for knowing what paper and embellishments are in my stash, but once in a while I wind up buying the same thing twice.  It always makes me laugh, because I liked it so well I had to have it two times!  In this case, I won’t waste them by throwing them out or anything that drastic.  I’ll go ahead and use them even if it offends my senses, because wasting things offends my senses even more!

Another way to build your paper stash is to purchase paper pads or paper packs.  The pads and packs are themed and are a great way to quickly build your stash for a particular project.  DCWV (Die Cuts With a View) puts out some great paper pads http://www.dcwv.com.  I have also found a great company from which to buy paper packs.  It is called Close To My Heart http://www.ctmh.com.  DCWV can be found in stores, while CTMH has to be ordered through a consultant or on the CTMH website.  I have no affiliation with either of these companies, I just like them.

A great way to build your cardstock stash is to purchase variety packs.  You will find they come in sort of “themed” packs – bright colors, pastels, earth tones, black and white.  You can also purchase single sheets of cardstock in a rainbow of colors to coordinate with your printed papers.  Cardstock usually comes manufactured one of two ways – each sheet is the same color all the way through, or each sheet has a white core.  There are some papers out there that have one color on the top and bottom with the core of the sheet being a coordinating color (think two shades of green – dark green on the outside, light green on the inside).  Cool huh???  Cardstock also comes in textures.  It can be smooth, textured like canvas, embossed with different patterns, glittered, flocked, etc.  My “go to” cardstock is smooth with the same color all the way through.  I like the smooth because I also do a lot of stamping and I think the images come out clearer and crisper using a smooth versus textured paper.  The choice of cardstock type is totally up to you.  Play with some of each and see what you like best.  Remember, this is YOUR scrapbook, YOUR art, and YOUR choice.  There is NO right or wrong.

Now, go forth.  Build your stash.  Build it a little at a time or go all out.  Watch the sales.

Until next time,

Mama Donna

Frugality in Scrapbooking

The subject seems to be taboo.  No one likes to talk about it.  I am here to shine a light on this dark subject. 


Scrapbooking is expensive!

There, I said it.

 How do you pursue your new hobby without breaking the bank?  There are ways.

I happen to be extremely fortunate in that I live in a city where there are a number of stores for me to shop for supplies.  I have a JoAnn’s, Michael’s, Hobby Lobby and a local scrapbook store called K & Krafts (I have no affiliation with any of these retailers).  When I began to pursue my passion, I was diligent about watching the sales.  I signed up online to receive extra coupons from each store.  Most importantly, I think, I shopped with specific projects in mind.  I still shop this way. 

I knew the first thing I wanted to scrapbook was a trip to Disney we took several years ago.  We are huge Disney fans and have gone a number of times.  So, when things went on sale, I began to accumulate supplies.  When brads were on sale, I would pick up a pack containing a variety of colors.  I did the same with ribbon, flowers and stickers.  I was patient.  There were very few items I bought at full price.  I realize that a lot of you will not have the local shopping options I did.  I am happy to say there are a lot of websites out there with very reasonable prices and a great selection.  Here are a few of my favorites:

http://www.scrapbook.com

http://www.twopeasinabucket.com

http://www.scrapyourtrip.com

http://www.cropchocolate.com

http://www.joanns.com

Again, I have no affiliation with any of these companies.  I just like them.  Of course you will have to pay shipping, which can get costly.  My suggestion is to do a google search for discounted or free shipping codes, combine shopping/shipping with a friend, sign up for the company’s newsletter so you will be alerted to sales and discounted shipping.

What are some other ways to cut costs?  My best advice here is be thoughtful.  Think about what you are buying and what you are doing.  Can I use this particular tool/supply in more than one way or is it a “one-hit wonder?”  For example, you may fall hopelessly in love with a paper punch in the shape of a skeleton.  Look at him dancing there!  How cute is that?  You think, “I could use him on my Halloween layout from last year.”  Yup, you can.  Now you see that the punch is $12.00 (punches are expensive).  Here’s where the thoughtfulness comes in.  Ask yourself, “How many layouts will I use him on?  In order to get my money’s worth, I would need to use him on EVERY Halloween layout.  Do I really want all my layouts to look the same?  Yes, he is adorable, but would my money be better spent purchasing a $3.00 pack of skeleton stickers at 40% off?”  Conversely, think about a balloon punch.  You could use this punch for birthday layouts.  Cool!  However, you can use it for New Years, Fourth of July, anniversaries, circus layouts, carnival and fair layouts, pretty much any celebration.  You can punch solid color paper or printed paper for a different look.  Now the $12.00 investment seems more reasonable.

Learn to think outside the box.  Look for scrapbook embellishments in the hardware store, the drug store, the dollar store, the thrift store.  It doesn’t have to be labeled “scrapbook supply” to use it. 

Be thoughtful in the way you cut your paper.  I mentioned this in yesterday’s post.  I always try to figure out how to leave myself with the largest piece I can.  If I can come out with any width x 12 inches, I can use that piece as a border on another page.  My general rule of thumb is if my smallest punch or rubber stamp will fit the scrap, I keep it.  I will trim it down so I don’t have all kinds of swiss-cheese-looking scrap paper and save it.  I’ll show you how I organize my scraps later. 

I’m going to talk about a huge investment I made almost immediately after igniting my passion.  I invested in a Cricut machine.  You can check them out at http://www.cricut.com.  I purchased the Expression.  No affiliation here whatsoever.  WHY would I make such a huge investment right off the bat?  Because it made sense to me.  At the time I made my purchase, there was a software program which would allow you to cut any font out with your Cricut.  I have a thing about fonts – I NEED the proper font for the page.  I thought about having to purchase a zillion different alphabet stickers and shuddered.  I thought about printing titles using my computer, having to cut them out by hand, and shuddered.  I knew that just for the letters alone, I would more than get my money back.  I also had a daughter in high school at the time making presentation boards, book reports and cheerleading signs who could get a lot of use out of the machine.  Not only could it cut the alphabets, but the Cricut also has several Disney cartridges.  My head danced and swam with all of the stickers and embellishments I wouldn’t have to purchase by using the Cricut.  A machine like this is definitely a large investment and one that should be weighed and considered.  For me, it just made sense.

Probably the best money-saving tip I can give you is to talk to people.  Attend crops.  Scrap with a friend.  If you are considering a new tool, talk to other scrappers to see how they like it.  Very, very often at crops people will bring tools and supplies you may not have.  I have never met a scrapper who was not willing to let me test drive one of their tools or borrow a stamp set.  It’s a great way to “try before you buy.”  The best thing, though, is meeting people who share your passion and in some cases, forming life-long, lasting friendships.

I hope I have given you some insight, hope and inspiration here.  Yes, this hobby can get quite expensive, but if you plan ahead, remember to be thoughtful and make purchases with a purpose, you don’t have to melt your credit card or deflate your bank account.

Until we meet again.

Mama Donna

A Language All Its Own

Each type of activity has its own vocabulary, terminology, lingo if you will.  Scrapbooking is no exception.  I’m going to attempt to define a few of the most common terms so you can feel more “in the know” when discussing your new hobby.

Crop – This term actually has two meanings.  1) To trim your photos; and 2) A gathering of scrapbook enthusiasts at a central location to work on a project.  When you hear someone say, “I’m going to crop this weekend” it generally doesn’t mean they are going to spend all weekend trimming photos one after another (although this may take place to a certain degree).  What they are talking about is that they are going to a location with other scrappers (sometimes in a church basement, sometimes in your local scrapbook store, sometimes at a meeting room) to spend some quality time away from home, chores, family, to scrapbook.  Sometimes everyone will be working on the same project (more of a class-type setting), but most often each person brings the scrapbook project they are currently working on and tries to make some headway on it.  A crop is a WONDERFUL thing.  It is a chance to meet and get to know other scrappers, learn new techniques, try new tools and products and gain a TON of inspiration by observing other styles.

Retreat – This is basically a two or more day crop, often in a splendiferous location (think resort).  Lots of times it’s a “Scrapbook Sleep-Away Camp” where you gather together, eat, laugh and scrap for a couple days.  It is GOOD for the soul.

Layout – Your layout is your scrapbook page.  It can be a single page like this:

Or a double page like this:

Whether you choose a single page or double page, is totally up to you.  I do a lot of double-page layouts because I take a lot of photos and I don’t like cramming too many on one page.  Let your photos speak to you.  Listen to their words.  Audition them on your page(s).

Title – Is just what it means.  It sums up the thought(s) or feeling(s) you are trying to convey on your layout.  Most scrappers I know use titles, but they are not necessary.  Remember, there is no right or wrong here.

Embellishment – This is the generic term used to describe any decoration you put on your scrapbook layout.  It can be a ticket stub, a map, a sticker, flowers, ribbons, eyelets, brads, stamped images, journaling, glitter, bling…. etc.  The possibilities are endless.  For clarification purposes, journaling is words (either handwritten or computer printed) you add to your page to describe what is going on, or feelings or general information about the event depicted in your layout.  I am not a big journaler.  I need to get better at it.  What I am is a big user of bling.  Bling is generally used to indicate sparkly jewels or pearls one adds to their layout to give it a little pop.  It can also mean glitter.  I use bling on nearly every layout (including boy layouts) because I like the interest it adds.  It can draw your eye around the page.

Album – The book you use to hold and display your finished layouts.  We will discuss different types of albums later.

Page Protector – A plastic sleeve you can slide your finished layout in to keep it clean and fingerprint free.  The page protectors go inside the album.

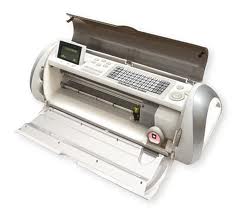
Cricut – (pronounced “cricket” – just like the bug) – A Cricut is an electric machine that will cut out letters and shapes.  The machine comes in several sizes.  I will be posting more about this kind of machine later, but wanted to throw the term out there so you had some idea what it is.  Here is what one looks like:

With that, you should be on your way to sounding like a seasoned scrapbooker (at least you won’t be in the dark when you hear some of these terms bandied about). 

Until next time,

Mama Donna

And Awaaayyyy We Go!

The moment has finally arrived.  We are going to create your first scrapbook page.  Aren’t you EXCITED?  I am!

While thinking about this post, I decided that I would play right along with you, using only the basic supplies we discussed previously.  Here they are:
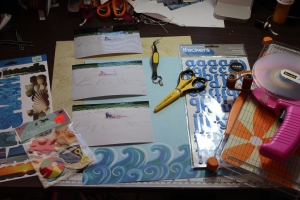
In addition to our basic tools, I have two 12 x 12 sheets of paper, one package of 3-D stickers, one sheet of flat stickers and one sheet of alphabet stickers along with the three photos I want to use in this layout.  I figured I had better be able to go back to just the basics and create a great layout if I was going to ask you to do the same.  On my honor, I used only the items you see in the above photo.  That giant pink thing?  That’s my ATG tape runner.  The one I photographed previously was just a different type of tape runner.  The ATG is the one I currently use, so I’m not trying to sneak anything past you.

This first step will undoubtedly be difficult for some of you, easier for others.  We are going to trim down our photos.  I am starting with standard 4 x 6-inch photographs, but there is too much extra “blank, uninteresting stuff” in them, so I am going to trim them down.
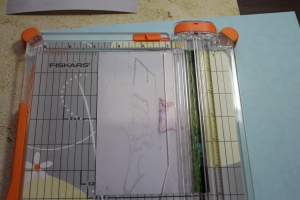
There is less “boring stuff” at the top of the photo, so I am going to trim it in a place that looks most pleasing to MY eye. 
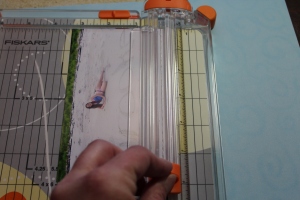
When I trim the bottom off the photo, I try to trim at a “standard” measurement – in this case, the photo is going to be 3.25 inches tall.  I try and trim at the quarter inch mark because it makes it easier for me to figure out what size to cut the mat for the photo (and I HATE to do math).  When I am done, all three of my photos are 3.25 inches x 6 inches.  While we are talking about trimming, you will notice I have the blade of the trimmer at the bottom of the photo.  I almost always trim from the bottom up.  Why?  Well, when you line your paper or photo up with the guide along the top of the trimmer, you know it is straight and even.  Whenever I cut from top to bottom, I almost always get too excited and trim too fast and then my photo or paper slips away from the guide and I wind up cutting it crooked.  If I trim from the bottom up, it forces the paper/photo to remain firmly pressed against the guides and I wind up with a perfect 90-degree corner instead of a wonky mess.

Let’s talk about matting photos for a second.  To mat, or not to mat, that is the question.  I prefer to mat my photos almost all of the time.  I know a lot of scrappers who almost never mat their photos.  It is a matter of personal preference and style.  As you develop your own style, you will know rather quickly whether or not you like your photos matted. 

Your photo mat can be any size you wish.  You can have as many mats as you wish (i.e. you can double, triple or “fourple” mat your photos).  My style most often is to single mat with a quarter-inch border.  This means that with my 3.25 x 6-inch photos, I want to cut my matting paper 3.75 x 6.5 inches.  This leaves .25 inches all the way around the photo.
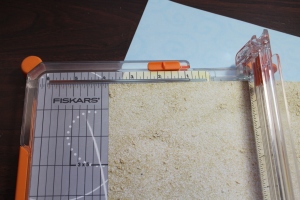
Here we are cutting our 12 x 12 mat paper down to size.  Before I begin cutting, I try to figure out how to best utilize my 12 x 12 paper.  Let’s face it, the paper can get expensive.  I try to cut it so that I wind up with the least waste and the largest leftover pieces I can.  I know that I have three photos and that each mat needs to be 3.75 x 6.5.  If I make my initial cut into the paper at 6.5 inches, have one piece measuring 6.5 x 12 and one piece measuring 5.5 x 12.  I can now take the 6.5 x 12 piece and get all three mats cut from it – 3.75 + 3.75 + 3.75 = 11.25 inches.  I will only have one tiny piece left over and will still have the whole 5.5 x 12-inch piece.  I can use the large piece later on another layout. 

Here I am using my tape runner to apply adhesive to the back of my photos.  I find it easier to apply adhesive to the smaller of whatever pieces I am working on and adhere the small to the large.
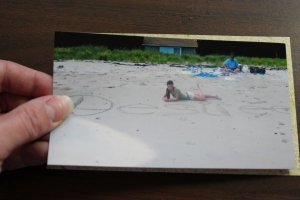
Adhering the photo to the mat.  I did this for each of my photos.  Now I am going to “audition” their placement on my background paper.
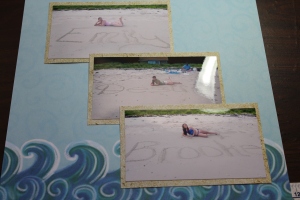
Should I place them this way?

Or this way?

Or this?

Hmmmmm….. Well let’s think about this.  I KNOW what and where I want my title to be.  Let’s start there.  Let me grab my letter stickers.

I want my title to be “bathing beauties” running across the top and down the side of my page.  Uh oh!  I can’t use my nifty tool for getting my titles on straight – it would be against the rules.  What to do?  I know!  I am going to peel the letters off the sticker sheet and arrange them along the edge of it like this:
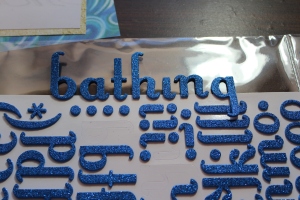
I am being very careful not to allow the letters to stick onto the packaging underneath the lettering sheet.  I get them all straight, pick up the sticker sheet, and place it where I want it on my page:

That looks about right.
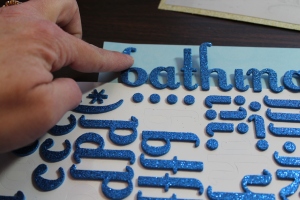
 

 I’m using my finger to stick the letters down onto the paper. 

Gently tip the sticker sheet towards your title to release the letters at the bottom.

Carefully slide the sticker sheet out from underneath your title.  Notice I have left the bottom of the letter “g” sticking up. 

That’s so I can slide my first photo underneath and let the “g” sit on top.  I am following the same procedure for the lettering going down the side of the page as described above.

I’m sure you’re wondering why there is no “t” or “i” in the photo.  I wanted those two letters to be centered in amongst the other “wider” letters.  I placed them on the sticker sheet for spacing purposes and then removed them prior to adhering the title to the page.  I went back afterwards and placed them just where I wanted.
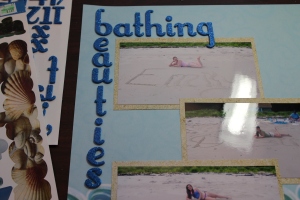
This is the result.

You can see in the photo I have overlapped my photos on the page.  I had a very hard time doing that when I began.  I thought it might be “wrong.”  Guess what?

THERE IS NO WRONG IN SCRAPBOOKING!

There are no scrapbook police who will breaking down your door in the middle of the night demanding to see your layouts to determine whether or not they are done “right.”  Nobody’s gonna haul you off to the scrapbook pokey.  The definition of right in scrapping is “if it’s right for you, it’s right.  Period.”  Hee hee hee!  I just made that up!  But seriously, there is no right or wrong way to do things here.  It is solely what appeals to you. 

That said, let’s wrap this project up.  I chose stickers from the two packages I had that “worked” best for me and the story I wanted to tell.  I used the word “sand” from the flat sheet along with the 3-D starfish, sand pail and beach ball.  There was also a popsicle in the 3-D pack that I did not use.  The Sesame Street song “One of these things is not like the others….” was running through my head.  To me, the starfish communicated the beach as did the sand pail and the fact that my bathing beauties were playing in the sand by writing their names.  I used the beach ball because, well because I liked the splash of color it added.  

 Here’s the finished layout.

WE DID IT!  We worked together step by step and completed your first layout!  How do you feel?  Excited?  Proud? 

I am so proud of you for stepping out of your comfort zone and trying something new.  You faced a creative challenge head on and came out a winner!  I would love to hear from you how you feel the process went.  Did you like it?  Will you try it again?  Are you hooked beyond all hope?

Thanks for scrapping along with me today.  I had a great time.  Until we meet again,

Mama Donna